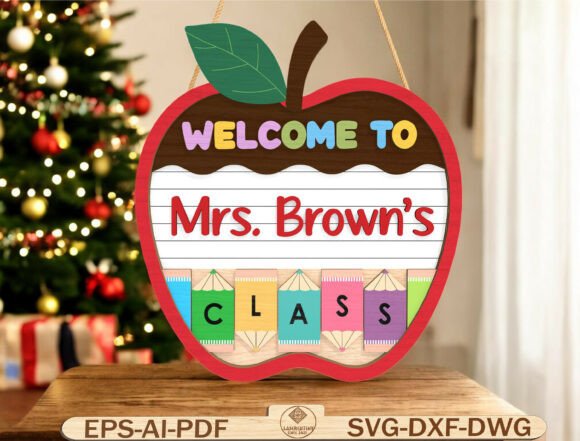
Personalized Teacher Apple Sign SVG: A Practical Guide to Creating a Welcoming Classroom
The start of the school year is a whirlwind of supply lists, lesson planning, and classroom setup. Amidst this chaos, first impressions matter more than ever. For educators, the classroom door serves as the threshold between the outside world and a space of learning, safety, and creativity. It is the first thing students see when they walk in, and often the last thing they remember as they leave. This is why a Personalized Teacher Apple Door Sign SVG has become an essential tool for modern teachers who want to create an inviting atmosphere without spending hours on complex crafts.
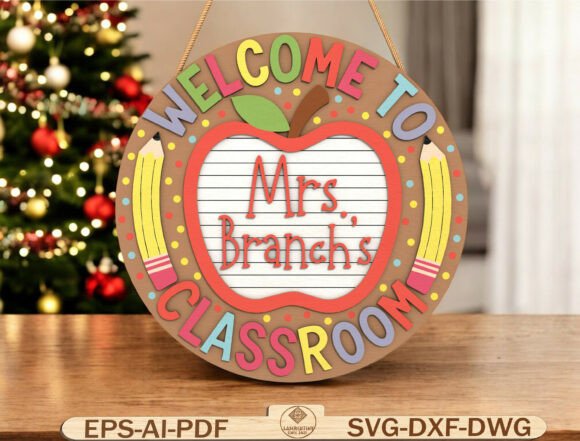
This digital asset allows you to design a professional-looking welcome sign that features a layered apple shape, colorful pencil details spelling “CLASS,” and your specific name. While the concept sounds simple, achieving a high-quality result requires understanding the technical nuances of vector files, material selection, and cutting settings. Many creators rush into production without checking these basics, leading to frustrated results, wasted materials, or signs that look amateurish rather than polished. By understanding the specifics of this design, you can ensure your classroom entrance sets the perfect tone for the year ahead.
Understanding the Digital Format and File Compatibility
One of the most common misunderstandings among new crafters is assuming that any file labeled "SVG" will work with every machine. The Personalized Teacher Apple Door Sign SVG comes in multiple formats—SVG, DXF, DWG, EPS, AI, and PDF—to accommodate different software ecosystems. However, not all of these files are created equal for every device.
If you are using a Cricut or Silhouette cutter, the SVG file is your best friend. It contains clean vector paths that translate directly into cut lines. However, if you are working with laser cutters like Glowforge, xTool, or OMTech, you need to be careful about how you import the file. Some older SVGs may contain grouped elements that cause confusion in laser software. Always open the file in your design software (such as LightBurn, Silhouette Studio, or Adobe Illustrator) before sending it to the machine. Check that the layers are separated correctly. The apple body, the pencils, and the text should ideally be on distinct layers so you can assign different colors or power settings to each element. Failing to do this might result in the laser burning through the delicate pencil details while leaving the main apple body uncut, or vice versa.
Another frequent error involves scaling. Vector files are fully scalable, which means you can resize them without losing quality. However, you must set the correct dimensions before cutting. If you intend to cut this sign at 12 inches wide, ensure your software reflects that size accurately. Cutting at 50% scale by mistake can make the text illegible from across the hallway, defeating the purpose of a welcoming sign.
Material Selection: Beyond Just Wood
The recommendation for this design suggests wood, MDF, plywood, or acrylic. While these are standard choices, the material you pick significantly impacts the final aesthetic and durability. A common mistake is choosing thin, low-density plywood that splinters easily during cutting. For a layered 3D look, you need material that holds its edge cleanly.
MDF (Medium Density Fiberboard) is often the preferred choice for laser cutting because it produces a smooth, uniform surface without grain patterns that might distract from the colorful design. It is also cost-effective for bulk orders or if you plan to make signs for multiple classrooms. However, MDF produces sawdust and smoke during laser cutting, so ensure your ventilation system is adequate. If you choose wood, such as birch or maple, you get a natural, warm aesthetic that pairs beautifully with the apple theme. But be aware that wood grain can sometimes interfere with intricate cut lines, especially around the small details of the pencils. Test a small section first to see how your specific sheet reacts to the blade or laser.
Acrylic is another popular option, particularly for a vibrant, glossy finish. Clear or colored acrylic can make the "CLASS" lettering pop, especially if you use contrasting colors. However, acrylic requires specific laser settings to avoid melting or cracking. Using too much heat can cause the edges to yellow or warp. If you are new to cutting acrylic, start with lower power and higher speed settings to find the sweet spot for clean cuts.
Avoiding Design Pitfalls: Layering and Text Customization
The charm of this sign lies in its layered 3D look. To achieve this, you typically cut multiple copies of the apple base in different colors and stack them, creating depth. A common oversight here is ignoring the kerning and spacing of the personalized teacher name. The design includes easy text editing, but if you change the font or the length of the name, the alignment might shift. A name that is too long can crowd the pencil details, making the sign look cluttered. Conversely, a very short name might leave awkward empty space in the center of the apple.
To avoid this, preview the design in your software at the actual size you plan to cut. Use the bounding box tools to check the overall width and height. If the name extends beyond the apple’s silhouette, consider adjusting the font size or choosing a shorter nickname. Additionally, ensure that the text is converted to outlines or paths before cutting. If you rely on a font installed only on your computer, the cutting machine might not recognize it, resulting in gibberish or missing letters. Converting to outlines embeds the font data into the file itself, ensuring consistency across all devices.
Practical Tips for Assembly and Display
Once the pieces are cut, assembly is key. Do not assume that glue will hold heavy layers together securely over time. For wooden signs, a strong wood glue or epoxy works best. Apply adhesive sparingly to avoid squeeze-out, which can mar the finish. Allow sufficient drying time before hanging the sign. Rushing this step can lead to layers shifting out of alignment, ruining the precise geometry of the design.
When mounting the sign, consider the weight. A 10–14 inch sign made of 6mm wood or acrylic can be heavier than expected. Standard command strips might fail if they are not rated for the weight of the material. Use appropriate hardware, such as picture hangers or heavy-duty adhesive hooks designed for the specific wall type (drywall, brick, or painted wood). Also, think about visibility. Place the sign at eye level for both adults and children. In elementary classrooms, getting down to the students' level shows respect and makes the environment feel more inclusive.
Evaluating Your Purchase Before Downloading
Before you download any Personalized Teacher Apple Door Sign SVG, take a moment to review the seller’s instructions and file previews. Look for clear images showing the finished product, not just the flat vector preview. Check if the file includes separate layers for the background and foreground elements. If the description mentions "laser-ready," verify that the line weights are appropriate for your machine. Thin lines might disappear in some laser settings, while thick lines might burn excessively.
Furthermore, consider the versatility of the design. Can you reuse the template for other holidays? Some sellers provide additional files for seasons like fall or winter. If you buy a standalone file, you might miss out on future updates or bonus designs. Reading reviews from other educators can also provide insight into how the file performs in real-world scenarios. Did others experience issues with the text editing? Was the customer support responsive if help was needed?
Ultimately, the goal is to create a sign that reflects your personality and welcomes your students with warmth. By paying attention to the technical details—file compatibility, material choice, layering precision, and secure mounting—you transform a simple digital download into a lasting piece of classroom decor. This approach saves time, reduces waste, and ensures that your hard work results in a professional, cheerful entrance that sets the stage for a successful school year.